Lunging a horse is more than an exercise—it’s a connection. It strengthens trust and communication between you and your horse.
Whether you’re training a young horse or keeping an experienced one fit, lunging plays a key role.
With the right equipment, patience, and simple techniques, it can be highly effective.
This guide will walk you through lunging step by step. From choosing tools to mastering advanced moves, you’ll learn it all.
Ready to transform those circles into a seamless rhythm? Let’s explore the art of lunging a horse together.
How to Properly Lunge a Horse: Key Takeaway
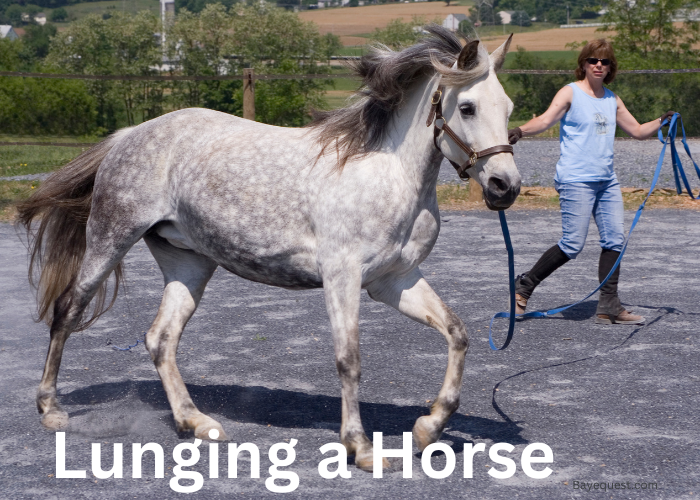
Lunging a horse is a training method where the horse moves in a circle around you on a lunge line, usually 20 meters long. It helps improve your horse’s balance, focus, and obedience. This exercise uses your voice, body language, and a lunge whip to guide the horse.
What is Horse Lunging?
Lunging a horse is a training technique where the horse moves in a circle around the handler.
It’s a great way to exercise the horse, improve its balance, and improve communication between horse and handler.
During lunging, the horse is usually attached to a long lunge line, and the handler uses body language, voice commands, and sometimes a whip to guide the horse’s movements.
It’s used for various purposes, including warming up the horse, teaching it to respond to commands, and observing its gait and behavior.
Benefits of Lunging a Horse
Lunging your horse is an essential training method with numerous benefits. These include:
Controlled exercise. Lunging provides a structured environment for your horse to exercise, particularly useful when riding isn’t feasible.
Training foundation. It is an effective way to teach young horses basic commands, improving their responsiveness and discipline.
Behavior management. Lunging helps manage and reduce excess energy or nervous behavior, promoting a calmer demeanor.
Physical fitness. It enhances your horse’s balance, strength, and flexibility, contributing to overall physical health.
Rehabilitation. This technique is valuable for rehabilitating injured horses. It allows them to move and exercise without the strain of carrying a rider.
Gait analysis. Lunging allows you to observe your horse’s movement, making it easier to identify any lameness or gait irregularities.
Interesting read: Equestrian Exercises to Improve Your Riding.
What Do I Need to Lunge a Horse?
To effectively lunge a horse, you’ll need the following equipment:
1. Lunge line. A long, sturdy line (usually 25-30 feet) that allows the horse to move in a large circle.
2. Lunge whip. A whip designed for lunging, used to guide and encourage the horse’s movements without physical contact.
3. Cavesson or halter. A specialized lunging cavesson or a sturdy halter to attach the lunge line securely.
4. Protective boots or wraps. Leg protection for the horse to prevent injuries during exercise.
5. Gloves. To protect your hands and provide a better grip on the lunge line.
6. Helmet. For your safety, particularly if working with a young or unpredictable horse.
7. Suitable footwear. Sturdy, closed-toe shoes or boots to protect your feet and provide stability.
What Lungeing Aids Would Help Your Horse?
Lunging aids can enhance the effectiveness of your training sessions by encouraging proper posture and movement in your horse. Here are some commonly used aids:
Side reins. These attach from the bit to the saddle or surcingle and help promote correct head carriage. This in turn encourages the horse to engage its hindquarters.
Lunging cavesson. Provides better control and more precise communication with your horse compared to a regular halter.
Pessoa training system. This system encourages the horse to work in a correct outline, engaging the hindquarters and lifting the back.
Vienna reins. Similar to side reins but with more flexibility, allowing for a more natural head position while still encouraging correct posture.
Chambon. Encourages the horse to lower its head and engage the back muscles, promoting a rounded frame.
Lunging surcingle. A padded belt that fits around the horse’s girth area and has multiple rings to attach lunging aids, providing versatility in training.
Cavaletti. Low, adjustable poles that help improve the horse’s balance, rhythm, and coordination during lunging.
How to Prepare the Horse for Lunging
Preparing your horse for lunging requires careful steps. Here’s how to do it professionally:
1. Select a safe area. Choose a flat, open space free of obstacles. A round pen is ideal.
2. Inspect the horse. Check for any signs of injury or discomfort.
3. Equip properly. Use a well-fitting lunge line, cavesson or halter, and protective boots or wraps.
4. Ensure your safety. Wear gloves, a helmet, and sturdy footwear.
5. Calm introduction. Lead your horse to the lunging area calmly to establish a connection.
6. Warm-up. Start with a few minutes of walking to warm up the horse’s muscles.
How to Lunge a Horse Correctly
Lungeing a horse involves the following practical steps:
Step 1: Set your equipment
Make sure you have everything ready before you begin. Attach the lunge line to a cavesson or halter.
Ensure the lunge whip is within reach but not intimidating. Check that protective boots or wraps are secure on the horse’s legs.
Finally, put on your gloves, helmet, and sturdy footwear for your safety.
Step 2: Start the lunge
Lead your horse to the center of the lunging area. Hold the lunge line in one hand and the whip in the other.
Stand still and gently send your horse out to the circle by walking in the opposite direction. Encourage the horse to start walking using a calm voice command.
Step 3: Use the reins and whips to command the horse
Once the horse is moving, use the lunge whip to guide its direction and speed. Keep the whip pointed towards the horse’s hindquarters to encourage forward movement.
Use clear voice commands for “walk,” “trot,” “canter,” and “whoa” to establish communication.
Maintain a consistent position and avoid excessive use of the whip.
Step 4: Keeping the horse focused in the lunge circle
Maintain a steady rhythm with your commands and body language to keep the horse focused.
Stay at the center of the circle and pivot as the horse moves around you.
Use the lunge line to gently correct the horse if it drifts out of the circle or slows down.
Keep your movements calm and deliberate to avoid startling the horse.
Step 4: Stop the horse
To stop the horse, gradually shorten the lunge line and decrease the whip’s movement.
Use a clear and firm voice command, such as “whoa,” and gently pull on the lunge line to signal the stop.
Walk towards the horse to reinforce the stop and reward it with a gentle pat or praise for good behavior.
How Long Should I Lung My Horse For?
The duration of lunging depends on the horse’s age, fitness level, and training goals.
For young or untrained horses, start with 10-15 minute sessions. Gradually increase the time as they get used to it.
Fit and experienced horses can be lunged for 20-30 minutes. Ensure to work both sides equally.
For warm-up or cool-down, 5-10 minutes is enough.
In rehabilitation, follow your vet’s advice, usually starting with 10-15 minutes. Always watch for signs of fatigue or stress and adjust accordingly.
Potential Dangers of Lunging a Horse for Beginners
Lunging, while beneficial, carries potential dangers if not done correctly.
The horse can become entangled in the lunge line, risking injury. Over-lunging can cause physical strain, leading to joint or muscle issues.
Incorrect use of aids, like side reins, may force the horse into unnatural positions, causing discomfort or injury.
A distracted or poorly trained horse might bolt or become aggressive. The handler is also at risk if they are not vigilant, as a sudden move by the horse can cause accidents.
Always prioritize safety and proper technique to mitigate these risks.
Common Lunging Mistakes and Solutions
The following are common mistakes and solutions you are likely to face when lunging your horse:
Mistake 1: Using incorrect equipment
Solution: Ensure you have the proper lunge line, cavesson or halter, and lunge whip. All gear should fit well and be in good condition.
Mistake 2: Standing too close or too far
Solution: Maintain a consistent position about 6-8 feet from the horse. This allows you to control the horse without being in its path.
Mistake 3: Inconsistent commands
Solution: Use clear and consistent voice commands and body language. Practice these commands to ensure the horse understands them.
Mistake 4: Overuse of whip
Solution: Use the whip as a guiding tool, not a punishment. Keep it pointed towards the horse’s hindquarters and use gentle, consistent movements.
Mistake 5: Not balancing work on both sides
Solution: Lunge the horse equally on both the left and right sides to promote balanced muscle development and flexibility.
Mistake 6: Lunging for too long
Solution: Follow appropriate lunging durations based on the horse’s age, fitness, and training goals. Monitor the horse for signs of fatigue.
Mistake 7: Ignoring safety precautions
Solution: Always wear gloves, a helmet, and sturdy footwear. Ensure the lunging area is safe and free of obstacles.
Advanced Lunging Techniques
Enhance your horse’s training with these advanced lunging techniques, improving fitness, responsiveness, and overall development.
1. Introducing side reins
Side reins encourage proper head carriage and help the horse engage its hindquarters.
Attach them from the bit to the saddle or surcingle, starting with loose reins and gradually shortening them as the horse becomes accustomed. (Read also: Types of Saddle Styles.)
2. Using cavaletti and ground poles
Improve balance, coordination, and muscle development by placing poles on the ground in the lunging circle.
Begin with one or two poles, increasing the number as the horse gains confidence, and space them appropriately for the horse’s stride.
3. Double lunging (Long-Reining)
Enhance communication and control by using two lunge lines attached to the surcingle and bit rings. Stand behind the horse and guide it with the lines, simulating riding without a rider.
4. Lunging over jumps
Build strength, agility, and confidence in jumping by starting with small, low jumps and gradually increasing the height. Begin with a single pole and progress to a series of jumps.
5. Incorporating transitions
Improve responsiveness and fitness by changing gaits and incorporating transitions within the gaits. Use clear voice commands and consistent aids.
6. Circle size variation
Engage different muscle groups and prevent boredom by adjusting the size of the lunging circle during the session.
Use larger circles for cantering and smaller circles for walking and trotting, ensuring gradual transitions to avoid strain.
7. Lunging for rehabilitation
Provide controlled exercise for injured or recovering horses by following veterinary guidance closely.
Start with short sessions, gradually increasing duration and intensity, focusing on even, steady movement without tight turns.
Safety Tips for Lunging
Prioritize safety with these essential tips to ensure a secure and effective lunging session for both you and your horse.
Wear protective gear. Always wear a helmet, gloves, and sturdy footwear to protect yourself from potential injuries.
Check equipment. Ensure all lunging equipment is in good condition and properly fitted to avoid accidents.
Safe environment. Lunge in a flat, open area free of obstacles to prevent trips or falls.
Stay alert. Be aware of your horse’s behavior and surroundings to anticipate and respond to any sudden movements.
Proper positioning. Stand at a safe distance from the horse, usually about 6-8 feet away, to avoid being kicked or trampled.
Use clear commands. Consistently use clear voice commands and body language to communicate with your horse effectively.
Monitor horse’s condition. Watch for signs of fatigue, stress, or discomfort and adjust the session accordingly.
Gradual introduction. Introduce new lunging aids and techniques slowly to prevent overwhelming or injuring your horse.
Warm-up and cool-down. Begin and end each lunging session with a few minutes of walking to properly warm up and cool down the horse’s muscles.
Emergency plan. Have a plan in case of an emergency, including knowing how to release the lunge line if needed safely.
How to Identify if the Horse is Working Correctly on the Lunge
To know if your horse is working correctly on the lunge, look for these signs:
1. Rhythmic movement. The horse moves in a steady, rhythmic gait without speeding up or slowing down unexpectedly.
2. Even circles. The horse stays on a consistent circle without drifting in or out.
3. Relaxed posture. The horse holds its head low and relaxed, not tense or high. (Check out what it means when a horse nods its head up and down.)
4. Engaged hindquarters. The horse uses its back legs actively, pushing off the ground with power.
5. Soft responses. The horse responds promptly and smoothly to your voice commands and aids.
6. Balanced stride. The horse’s steps are even and balanced on both sides, without any limping or unevenness.
7. Focused attention. The horse keeps its ears and eyes on you, showing it’s paying attention and not distracted.
Can I Lunge a Horse With a Rider on?
Yes, you can lunge a horse with a rider on, but it requires caution and experience. This technique can be useful for training purposes, helping the rider and horse develop better balance and coordination.
Ensure the horse is comfortable with lunging and the rider is experienced. Start slowly, with the rider maintaining a light seat and minimal interference with the horse’s movement.
Communicate clearly with the rider to coordinate commands. Always prioritize safety and avoid overworking the horse. If in doubt, seek guidance from a professional trainer.
Lunging for Beginners: Conclusion
Lunging a horse is more than just exercise; it’s a bonding experience. It helps build trust, strength, and communication.
You can make the most of your lunging sessions with the right equipment and techniques. Remember, start slow, stay consistent, and always prioritize safety.
Whether you’re training a young horse or giving an old friend a workout, lunging is a valuable tool. Keep practicing, and you’ll see great results.
Now, grab that lunge line and whip, and get your horse moving in style.


